Showing posts with label whole-food. Show all posts

Sunday, January 06, 2013

New Year's Black-Eyed Pea Quinoa Salad

Happy New Year everyone! I hope you had a lovely holiday season. I know that I did - it was really nice to relax and see friends and family. Unfortunately, all good things must come to an end and it's time to head back to school tomorrow. 

I went shopping at the Whole Foods at Cambie and 8th in Vancouver this past week - always a treat since it's so expensive there! My favourite part of that store is the bulk foods area - they always have really different and interesting grains and legumes. I make a point of getting at least one or two new types that I haven't tried each time I go there. The nice thing about buying bulk, dry grains and legumes is that even though Whole Foods is expensive, stuff like that is still pretty reasonable in price. Way cheaper than buying meat, that's for sure!

This time around I thought I'd buy black quinoa and black-eyed peas, neither of which I have ever tried. Both just looked interesting. Later on when looking for inspiration on what to do with the black-eyed peas, I also found out that in the Southern US, eating black-eyed peas on New Years Day helps give prosperity throughout the new year. I'm a few days late, but I figure it can't hurt!

This recipe was inspired by Laura McAllister's Szechuan Black-Eyed Pea Salad recipe, but I decided I needed more grain in the salad to make it a complete meal and not just a side. I also didn't have a few of the ingredients she used, so I substituted and improvised. The result was a very tasty "salad" that can be served warm or cold.

Black-Eyed Pea Quinoa Salad
Yield: 4 meal-sized servings

Ingredients:
1 cup (250 ml) black quinoa (or any other variety)
2 cups (500 ml) water
2 cups (500 ml) cooked black–eyed peas
1 medium green bell pepper, diced
1 clove garlic, minced
1 Tbsp (15 ml) Earth Balance margarine
2 avocados, cubed
2 Tbsp (30 ml) lemon juice
3 Tbsp (45 ml) olive oil
3 Tbsp (45 ml) white wine vinegar
2 Tbsp (30 ml) gluten-free tamari (or soy sauce)
2 tsp (10 ml) sugar
1/8 tsp (0.5 ml) cayenne pepper

Method:

1) Rinse quinoa and put into a pot with 2 cups of water. Cover and bring to a boil. Reduce heat and let simmer for about 20 minutes. Remove from heat, let sit for 5 minutes, then fluff with a fork.

2) Saute garlic and green pepper in margarine for a few minutes, until slightly softened. (You could skip this step if you'd prefer raw garlic and pepper.)

3) Toss cubed avocado with the lemon juice.

4) Combine cooked quinoa, cooked black-eyed peas, green pepper, garlic, and avocado in a large bowl.

5) Using the same bowl that you stirred the avocado and lemon juice in (that's now empty), whisk together olive oil, white wine vinegar, tamari, sugar, and cayenne.

6) Pour dressing over the salad and toss to combine.

7) Serve immediately for a warm salad, or refrigerate and serve cold.


This was quite tasty! Just a slight hint of spiciness from the cayenne, which you could adjust to your preference. The textures were nice and varied - the avocados and peas providing a luxurious creaminess, while the quinoa and bell pepper gave it a bit of a crunch too. If you use the gluten-free tamari rather than traditional soy sauce, then this is also a gluten-free dish!

Happy New Year, and good luck with back-to-school for all the teachers and students out there!

Monday, November 26, 2012

A triumphant return!

So tonight marks the first "real" dinner that I've made since becoming pregnant and not being able to think about food. I was inspired this afternoon.. and boy was the hubby happy to have someone else make dinner for once! I've got a pretty big sweet tooth this pregnancy (not so much with my first one), so I wanted something that had a sweetness to it, but was still full of good stuff. This stew was my answer... feel free to customize as you see fit - don't have any purple yams? Just add in sweet potatoes, or even regular potatoes... with stews, it all works!

Butternut Squash Stew
Yield: 12 ladle-sized scoops (about 6 servings)

Ingredients:
1 L vegan butternut squash pre-made soup*
1 small purple yam
1 large orange yam
1 very long carrot, or two regular sized ones
1 cup (250 ml) red lentils
1.5 cups (375 ml) water
1 cup (250 ml) frozen corn

*I used Pacific Foods brand - it's vegan and fairly tasty on its own.


Method:
1) Chop up the yams and carrots into small, bite-size pieces. Isn't that purple yam pretty? I'd planned on using more of it, but the other ones rotted. So sad! Interestingly, they smelled like guava when they began to rot. Note to self: do not store yams in a plastic bag in a cupboard near the dishwasher!


2) Put the soup, chopped veggies, red lentils, and water into a large pot.


3) Stir, cover, and bring to a boil.


4) Uncover, reduce heat to low, and simmer for 35 minutes, stirring occasionally.

5) Add the frozen corn, then simmer for another 5 minutes.

6) Serve hot! I had some Persian bread on the side, which was very tasty.


The stew was not only appetizing to my still somewhat-nauseous tummy, but hubby liked it too. You could also try spicing it up a bit with some paprika! Or add a bit of curry powder for another flavour dimension. Soups and stews are a lot of fun since you can really add anything you want. Happy cooking!

Tuesday, November 20, 2012

A Vegan Miracle!

Sorry for being rather absent from the blogosphere for the last few months... I've been so nauseous that I could barely think about food let alone write about it! Yes, folks, I'm pregnant! But there's a whole lot more behind that statement....

To really understand why I believe my pregnancy to be a "vegan miracle," you need to know a little more about my history. When I was a teenager, I never had regular cycles. I remember going through entire summers without seeing good ole Aunt Flo, which really, was awesome back then. I mean, who really wants to get a period every month, especially during bathing suit season? Every 3-4 months, that's way easier! Unfortunately, what was excellent as a teen and young woman became a bit of a liability when my hubby and I decided it was time to start a family. After trying for six frustrating months and only experiencing one period during that time, we decided to see our family doctor. He looked at my history and decided to refer me to a fertility specialist. 

I didn't quite know what to expect when we made our first appointment with Pacific Centre for Reproductive Medicine, but was very pleasantly surprised when we walked in the door - the office was gorgeous! All beautiful wood and calming greens and whites. Really pretty. And luckily, the doctor and the rest of the staff were pretty nice too. He looked at my history, decided to send me for some blood work, and also did an ultrasound of my ovaries. Turned out that not only was my thyroid very off - I was barely producing any thyroid stimulating hormone (that explained the tiredness and joint pains I'd been experiencing), but my ovaries also looked like I had Polycystic Ovarian Syndrome (PCOS). With PCOS, basically my ovaries do not ovulate normally - they create lots of little "cysts" with immature eggs inside of them, which is normal, but normally at least one of those eggs will mature and burst out of the cyst... which is when ovulation occurs. My eggs never matured so I was just left with a bunch of little cysts - not painful and not cause for concern, but they did get in the way of trying to conceive naturally! We corrected the thyroid issue with medication that I'll be on for the rest of my life, but the PCOS was a little more difficult to deal with. There really is no "cure" for PCOS, so the doctor decided to try me out on the first step in combating infertility caused by "lack of menses." This first step is called clomid, and it's basically just a pill that you take for a few days at a certain time of the month that gives your ovaries a kick-start to ovulate. After a couple of tries with getting the dosage right, it finally started making me ovulate and a couple of months later, I was pregnant with my son. Awesome.

When my son was one year old, we decided to start trying right away for a second since we'd had a hard time getting pregnant that first time. Everyone had always told me that likely I would have no problem getting pregnant a second time since my body "knew what to do now." Boy were they wrong. We tried for a couple of months on our own, but I still wasn't getting a period (and I'd stopped breastfeeding), so we went back to clomid. After raising the dosage on the clomid repeatedly over several months, we finally faced the reality that it had stopped working for me. Apparently, this is not uncommon, but it was sure inconvenient!

After that, we went on to try Intrauterine Insemination (IUI) - which is basically artificial insemination - our own eggs and sperm, but no fun part. We tried a few rounds of this, none of which had any success either because I only produced one egg or produced five or more - apparently my ovaries were "fragile" and very sensitive to changes in the medication dosage. This did lead my doctor to believe that I would be a good candidate for in vitro insemination (IVF) since apparently my ovaries were good at producing multiple eggs with higher dosages of the medication. So, we tried that as well - I made 17 eggs, 11 of which were fertilized. First round, we transferred two fresh embryos. I did get pregnant, but miscarried very soon after. So we tried again with some "kidsicles" as we liked to call them. We transferred another two and again I got pregnant and miscarried very early. Well at this point we were understandably rather depressed about the whole situation, so we took a break for a few months. Eventually we decided to try one last frozen embryo transfer but this time with three embryos for a better chance... and nothing took at all in that last one! We were out of embryos (some didn't survive the thawing process), and my body was a mess. IVF involves some pretty heavy dosages of hormones and I decided I needed a real break to get my body healthy. We weren't sure where we were heading with still trying to have a child (we never gave up hope that it would happen someday for us!), but I knew it would be a while before I would feel ready to face the prospect of more infertility treatments, which seemed to be the only possible course of action for us.

So this brings us to this past year in the spring. Have a look at this post for my story about why I became vegan... and the other back story is that I just really wanted to do some good things for my body. So after a couple of months of eating exclusively plant-based, I had a near-normal cycle - just 32 days. This was entirely unheard of for me, so I said to the hubby, "maybe it will be normal next month too - why don't we just try and see what happens?" Well, famous last words... it happened! Just one month of "trying" completely naturally and I was pregnant. We were shocked, to say the least!

Now I'm sure there are some naysayers and skeptics out there who won't believe that going vegan is what made it possible for me to get pregnant naturally. Well, here is a list of why going vegan is EXACTLY what helped me get pregnant...

  1. Skeptic: you'd stopped trying and it always happens when you're not really trying. Fact: we hadn't stopped trying - we'd never given up hope and were actively trying the month that I did get pregnant. 
  2. Skeptic: you must have lost weight on your new vegan diet and losing weight helps you get pregnant. Fact: while I did end up losing about 10 pounds before becoming pregnant, when my cycle originally normalized I had lost no more than five pounds, and probably less. Five pounds is so little that it would have no effect on my fertility. 
  3. Skeptic: you weren't so stressed when you were trying naturally as you must have been when you were doing infertility treatments. Fact: we conceived during the first week back for a new school year. If that's not a stressful time, I don't know what is!! 
  4. Skeptic: you weren't eating much processed food and that was probably impacting your fertility. Fact: while I might have eaten marginally more processed food as a non-vegan, really it was just marginal. I was never a huge processed food eater. 
  5. Skeptic: you were exercising a lot more with boot camp three days a week. Fact: while I was definitely exercising more around the time I got pregnant, I don't think this was what helped. When I got that first near-normal cycle of 32 days, I hadn't yet started boot camp. I'm sure the exercise helped because really, how could it not, but it wasn't the only thing that helped. 

Convinced yet? I could probably go on and refute anything the skeptics could come up with, but the fact remains that at least for me, cutting meat and dairy out of my diet helped my own natural hormones to work properly. Makes you wonder what is in our meat and dairy, eh? I've found at least one other blogger who had a similar experience to me... you can read her story here. We'd spent over $10,000 on trying to get pregnant, but all it took was changing what I ate. Go figure!

So, suffice it to say that I am thrilled with the unforeseen side effect of my plant-based diet, and still in a state of shock. I think it might become more "real" once I start feeling those first little flutters of movement. I'm due around June 4, 2013, so as of this posting I am at 12 weeks, just about to start in on my second trimester. The nausea is starting to dissipate slowly, so hopefully I can get back to cooking and posting here soon! I'm trying to remain as vegan as possible during the pregnancy, but have definitely been tested by this "all-day" sickness since NOTHING has looked good to eat and my body apparently isn't able to currently digest beans and legumes (I tried them - it wasn't pretty). I have indulged in real cheese and several Filet o'Fish (oh the shame!), but my hope is once my body becomes more receptive to food in general that I can get back to full-time veganism. I bought a book called The Everything Vegan Pregnancy Book by Reed Mangels which has been very informative. She also includes lots of recipes, so I plan to start trying some of those out soon!

And now I think I'll leave you to let this all sink in... there's a bowl of vanilla soy frozen dessert calling my name! 

Monday, October 01, 2012

No-Chop Lentil Pilaf

As a vegan, you tend to eat a lot of vegetables. And consequently, you tend to chop a lot of vegetables. You get to be very intimate with your cutting board and knife! Tonight, I wanted a break from all that chopping, but I still wanted our meal to be nutritious and as whole-food as possible. I came across this recipe that used Beluga Lentils, and I just happened to have a bag of pre-cooked ones in the freezer. Plus, the recipe could be made to be chop-free, which was perfect! So here is my adapted version of Cookgirl's Black Beluga Lentil Pilaf recipe.

No-Chop Lentil Pilaf
Yield: 5-6 meal-sized servings

Ingredients:
2 cups (500 ml) sprouted brown rice (or a rice of your choice)
3 cups (750 ml) water
1 clove garlic, minced (I got around the chopping for this part by using pre-minced garlic!)
1 tsp (5 ml) cumin
1 cup (250 ml) raisins
2 cups (500 ml) pre-cooked beluga lentils (or another lentil of your choice)
1 cup (250 ml) frozen green peas
Salt and pepper, to taste

Method:
1) Rinse rice and place in a large pot. Add water, minced garlic, and cumin. Stir to combine. Bring to a boil over high heat, then reduce heat to low and let simmer for 25 minutes.

2) If raisins are getting a little old and crusty, which mine were, put them in a bowl and cover with water to let them "plump." Leave them in the water while the rice cooks, and don't forget to discard the water before you use the plumped raisins.


3) Once the rice is done, mix the lentils, raisins, and frozen peas into the pot. Let sit for about five minutes with the lid on, until the peas have thawed and everything is warmed through.

4) Season with salt and pepper as desired.


I like the colour the bright green peas give to the dish, and I also like to add something green in whenever possible. Green = good for you! The sweetness of the peas and raisins is a nice counterpart to the more savoury rice and lentils. I did find the dish to be a bit dry, so if that bothers you, you could mix in a bit of vegan margarine. We served it with a bun on the side, which was very tasty. This was also a really nice fast dish that makes a lot - perfect for freezing or leftovers!

Monday, September 17, 2012

Forbidden No More

A few weeks ago I discovered Forbidden Rice (sold by Lotus Foods). My local Whole Foods sells it in the bulk section. Forbidden rice is amazing! I am seriously in love with it. It's this beautiful rich deep purple, almost black colour. So gorgeous. It has a similar nutritional profile to brown rice, but with lots of additional antioxidants* due to its rich colouring. The flavour is slightly nutty, and the texture is chewy. Legend says that the only ones allowed to eat it in imperial China were the Emperor and his family... but lucky for us, we get to play king (or queen!) for a day now! 

I was looking for a good recipe to try this week with my forbidden rice and came across this one by Giada Di Laurentiis on the Food Network. It looked interesting so I thought I'd give it a try, with a few modifications. So here's my version of Giada's recipe for:

Forbidden Rice with Peaches and Peas
Yield: about 6 meal-sized servings (more if using as a side)

Ingredients:
3 1/2 cups (875 ml) water
2 cups (500 ml) forbidden rice
1/2 tsp (2 ml) sea salt
2 1/2 cups (625 ml) snap peas
2 large peaches

1/4 cup (60 ml) toasted sesame seeds

Dressing:
1 Tbsp + 2 tsp (25 ml) seasoned rice vinegar
1/8 cup (30 ml) flaxseed oil
1.5 Tbsp (22 ml) agave nectar
1 Tbsp (15 ml) soy sauce


Method:
1) Rinse rice and place in a saucepan. Add 3.5 cups of water and bring to a boil. Reduce heat to low and simmer for 30 minutes or until tender. Let sit for five minutes, then fluff with a fork and transfer to a large salad bowl.

 
2) Cut the snap peas into 1" sized pieces.


3) Pit the peaches then slice them.


4) Spray a large non-stick frying pan with oil, then heat to medium-high. 

5) When drops of water "dance" on the pan, add the snap peas. Cook, stirring frequently, for two minutes. They should be shiny and starting to get soft.


6) Add the peach slices and cook for another two minutes.


7) Add the hot peas and peaches to the same bowl as the rice.

8) Whisk together the rice vinegar, flaxseed oil, agave nectar, and soy sauce until cloudy-looking.

9) Pour the dressing over the rice mixture and toss well.


You can eat this "salad" either warm as we did this evening, or at room temperature which is what we'll likely do tomorrow. The flavour was good, but it seemed to be missing something. The hubby had a brilliant idea - putting toasted sesame seeds on top! So that's what we did for the leftovers we'll have for lunch tomorrow. The sesame seeds added a good additional flavour, and they also contrast nicely against the black, green, and peachy colours of the other ingredients.


I'm already dreaming of other recipes I might try with forbidden rice... I've heard it makes an amazing rice pudding. I'll let you know if I try it!

* A note on antioxidants... when I asked my Grade 11/12 students today what an "antioxidant" was, almost nobody in the class could give me an answer. Finally, a tentative student put up his hand and said, "um, they prevent cancer?" He was basically right. I find that there are many "healthy food" words thrown around and a lot of the time, most people have no idea what they actually mean. Antioxidants prevent free radicals, which are these nasty bad guys that go around our bodies wreaking havoc, from causing harm. Free radicals have been associated with a number of diseases, most notably cancer. Consequently, antioxidants are probably best known for helping prevent cancer. But beware of supplementation - taking antioxidants in supplement form is not the same as getting them from real, whole foods. Supplementing can actually do the reverse for you and cause you harm. Always go for the real stuff! Not only is it much tastier, but there are all kinds of other nutrients in antioxidant-rich foods as well! Antioxidants are usually found in foods with beautiful, deep colours like berries, or this forbidden rice. Colour is a great way to choose your food - if it looks pretty, it's probably good for you!

Sunday, September 16, 2012

Sunday Brunch Pancakes!

I love pancakes. Luckily, so do my son and husband. They are one of our favourite breakfast-for-dinner options, and I always make lots so I can freeze them and send them to daycare with my son for his lunch. Or, you can also just pop a frozen pancake in the toaster oven for a quick delicious breakfast. Mmmm... pancakes.

I have been using a recipe from this cookbook called Cooking Without Mom (1986, Hen Party Enterprises) that my mom gave to me when I first moved out on my own. It's a neat little cookbook that has seen me through a lot, but my favourite recipe in it has always been the pancakes recipe. When I decided to go whole-food vegan, I tried a few vegan pancake recipes online, but none ever came close to being as good as the ones from this cookbook. I wanted to make some pancakes this morning for brunch, but got discouraged by the idea of trying yet another pancake recipe that wasn't going to cut it. And then, I had the brilliant idea of whole-food veganizing the original recipe that I love so much. Luckily, it worked! The finished pancakes were light, fluffy, and oh-so-delicious. And, they had oodles of good stuff in them too with no added sugar or fat.

The Best Vegan Pancakes Ever
Yield: 11 1/3-cup sized pancakes

Ingredients:
2.5 cups (625 ml) whole wheat flour
1/2 cup (125 ml) quinoa flour
2 Tbsp (30 ml) baking powder
1/2 tsp (2 ml) salt
2-3 tsp (10-15 ml) cinnamon
2.5 cups (625 ml) unsweetened non-dairy milk
1 cup (250 ml) water
1 tsp (5 ml) vanilla
1 small or 1/2 large ripe banana, mashed
1 flax "egg" (1 Tbsp ground flax meal + 3 Tbsp warm water)

Method:
1) Whisk together flax meal and warm water. Let sit for 5-10 minutes until thickened. Whisk again before adding to wet ingredients.

2) Combine flours, baking powder, salt, and cinnamon until evenly mixed.

3) Mix together "milk," water, vanilla, mashed banana, and flax egg.


4) Make a well in the dry ingredients, add the wet all at once, then mix until just combined but still lumpy.


5) Preheat your non-stick frying pan(s), using low-medium heat (about a 4 if your stove has numbered dials). I always use two non-stick pans so that I can cook more pancakes at once. Non-stick also prevents you from having to use oil. Always remember to use a plastic flipper to avoid scratches, and get a new pan once you start seeing cracks in the non-stick finish. You'll know your pan is preheated enough once you drop a few drops of water onto it and the water "dances."

6) Use either a 1/3 cup (80 ml) measuring cup or a ladle to portion out the pancakes. Drop them onto your preheated pans, making a circular shape.


7) Let cook for about 2 minutes. You'll know they are ready to flip when they get bubbles all over and the edges look dull. They should be golden brown once you flip them.


8) Cook for another minute or so after flipping until the other side is golden brown.


9) If you are making a lot and not planning to eat them fresh off the pan, heat your oven to about 200-225 F. Put a cooling rack onto a cookie sheet and place your pancakes on top of this in the oven. It will keep them warm without letting them get too soggy.


10) Serve pancakes hot with a topping of your choice. Here is my finished pancake with maple syrup. Sometimes I do a fruit sauce for a topping, chop some fresh fruit on top with maple syrup, and sometimes I put almond butter on top. All delicious ways to eat these pancakes!


A note on quinoa flour: quinoa is high in protein and iron, so it's excellent for vegans. I tried making some pancakes using all quinoa flour, but the taste was so overpowering that it just wasn't appetizing. I'm experimenting with how much I can put into a recipe without my son saying, "Mommy, this tastes funny." A half cup in this recipe worked - couldn't taste it, but it still adds some nutrition. You might be able to get away with more quinoa flour and less whole wheat. Alternatively, if you have no quinoa flour on hand, all whole wheat will also work. You could also try different flours, like spelt or kamut. I will probably experiment with these alternative flours at some point in the future!

Another tip for this recipe: you can also add in finely diced apple, blueberries, raisins, or vegan chocolate chips. Add no more than 1 cup. The diced apples are my favourite! Enjoy!

Saturday, September 15, 2012

The Pleasure Trap

So it's been a while since my last post. The hubby and I do a one-week-on-one-week-off schedule for making dinners, and this was my week off. Likely I won't post much during my off weeks, but the hubby might do some guest posts!

Since I had some time freed up this past week from making dinner, I decided to do a little baking. I love to bake, and it's been really fun trying my hand at veganizing recipes for a variety of baked goods (my favourite way to replace an egg - mix 1 Tbsp ground flaxmeal and 2-3 Tbsp water; let it sit for about 5-10 minutes until thickened). I had some bananas that needed to be used up, and was feeling like oatmeal raisin cookies... so I decided to make some Banana-Maple Oatmeal Cookies from the FatFree Vegan Kitchen. Susan has some great recipes on this site, and the vast majority have no added fat - just the naturally occurring fats in the whole-food ingredients. Here's what the cookies looked like:


They were tasty, had a cakey consistency, and didn't make me feel too bad about eating a couple. But eating cookies made me think a little about something I learned in my Certificate in Plant-Based Nutrition: the Pleasure Trap. Ever wondered why we eat things we know are bad for us? Read on...

The Pleasure Trap is a concept created by psychologist Doug Lisle - check out a lecture from him here on YouTube. He also wrote a book on the subject (with Alan Goldhammer) called The Pleasure Trap: Mastering the Hidden Force that Undermines Health and Happiness - check it out for a much longer and detailed explanation of what I will discuss below.

So, here is my understanding of the Pleasure Trap. We are hardwired to seek pleasure, avoid pain, and conserve energy. When we eat high-caloric foods, we get a zap of pleasure because not only does it taste good, but it was a really easy way to get our caloric needs met (so we conserved energy in doing so and avoided the pain of malnutrition). Dr. Lisle says our bodies can distinguish even small caloric differences - that's why an apple tastes better than a piece of lettuce, for example. Our body knows that apples have more calories than lettuce, and consequently  innately prefers apples to get our caloric needs met easier. Most foods in a standard western diet are high in caloric content, so it's easy to get our caloric needs met (avoiding the pain of malnutrition) with food that tastes good (causes pleasure) without putting forth too much effort (conserving energy).

So, that's one side of it. Let's move on to discussing the Dietary Pleasure Trap. There is an awesome graph here that will give you a visual of this concept. Basically, there are three pleasure zones - the subnormal, normal, and enhanced pleasure zones. When we eat natural whole foods, we are getting our caloric needs met, they taste good, and we're in the normal pleasure zone. This is where we want to be. But, when we eat those high-caloric processed foods that are not good for us, we get a boost into the enhanced pleasure zone. If we keep eating those high-caloric foods, we are kept in the enhanced pleasure zone so long that eventually it becomes normal for our bodies, so we fall back into the normal pleasure zone, always looking for another jolt that will take us back to enhanced pleasure. So we keep eating more and more high-caloric foods, and consequently keep getting fatter and fatter, and sicker and sicker. But, we just can't quite seem to reach that enhanced pleasure zone anymore! So, the cure for that is to change our diets back to whole, natural foods. When we do change our diet, it is initially such a shock to the system that we drop to the subnormal zone. This is why when you start to eat right, your body says, "whoa, something is seriously wrong here! I miss meat! I miss cheese! I miss doughnuts! I miss chips! Give them to me and I'll be happy again!" But, in reality, what you need to do at this point is just stay strong and tough it out. The transitional period will only last for a few weeks - it sucks, but you'll get through it. After those few weeks, your body will re-adjust to the normal pleasure zone and you'll feel better than ever! Natural, whole foods will once again taste amazing, and you should find yourself craving that bad stuff a whole lot less, if at all.

I know learning about this helped me to understand my motivation a lot. I can feel the shift to enhanced pleasure now when I eat something I know isn't all that great for me, like those cookies. But I also now know enough that when I do feel that enhanced pleasure, I back off and let my body come back to normal so that I don't cause myself to desire that enhanced pleasure too much. I feel satisfied after just one cookie, for example, rather than four or five! Navigating the Dietary Pleasure Trap can help you take control of your health and do what is right for your body. Good luck!

Thursday, September 06, 2012

Experimentation

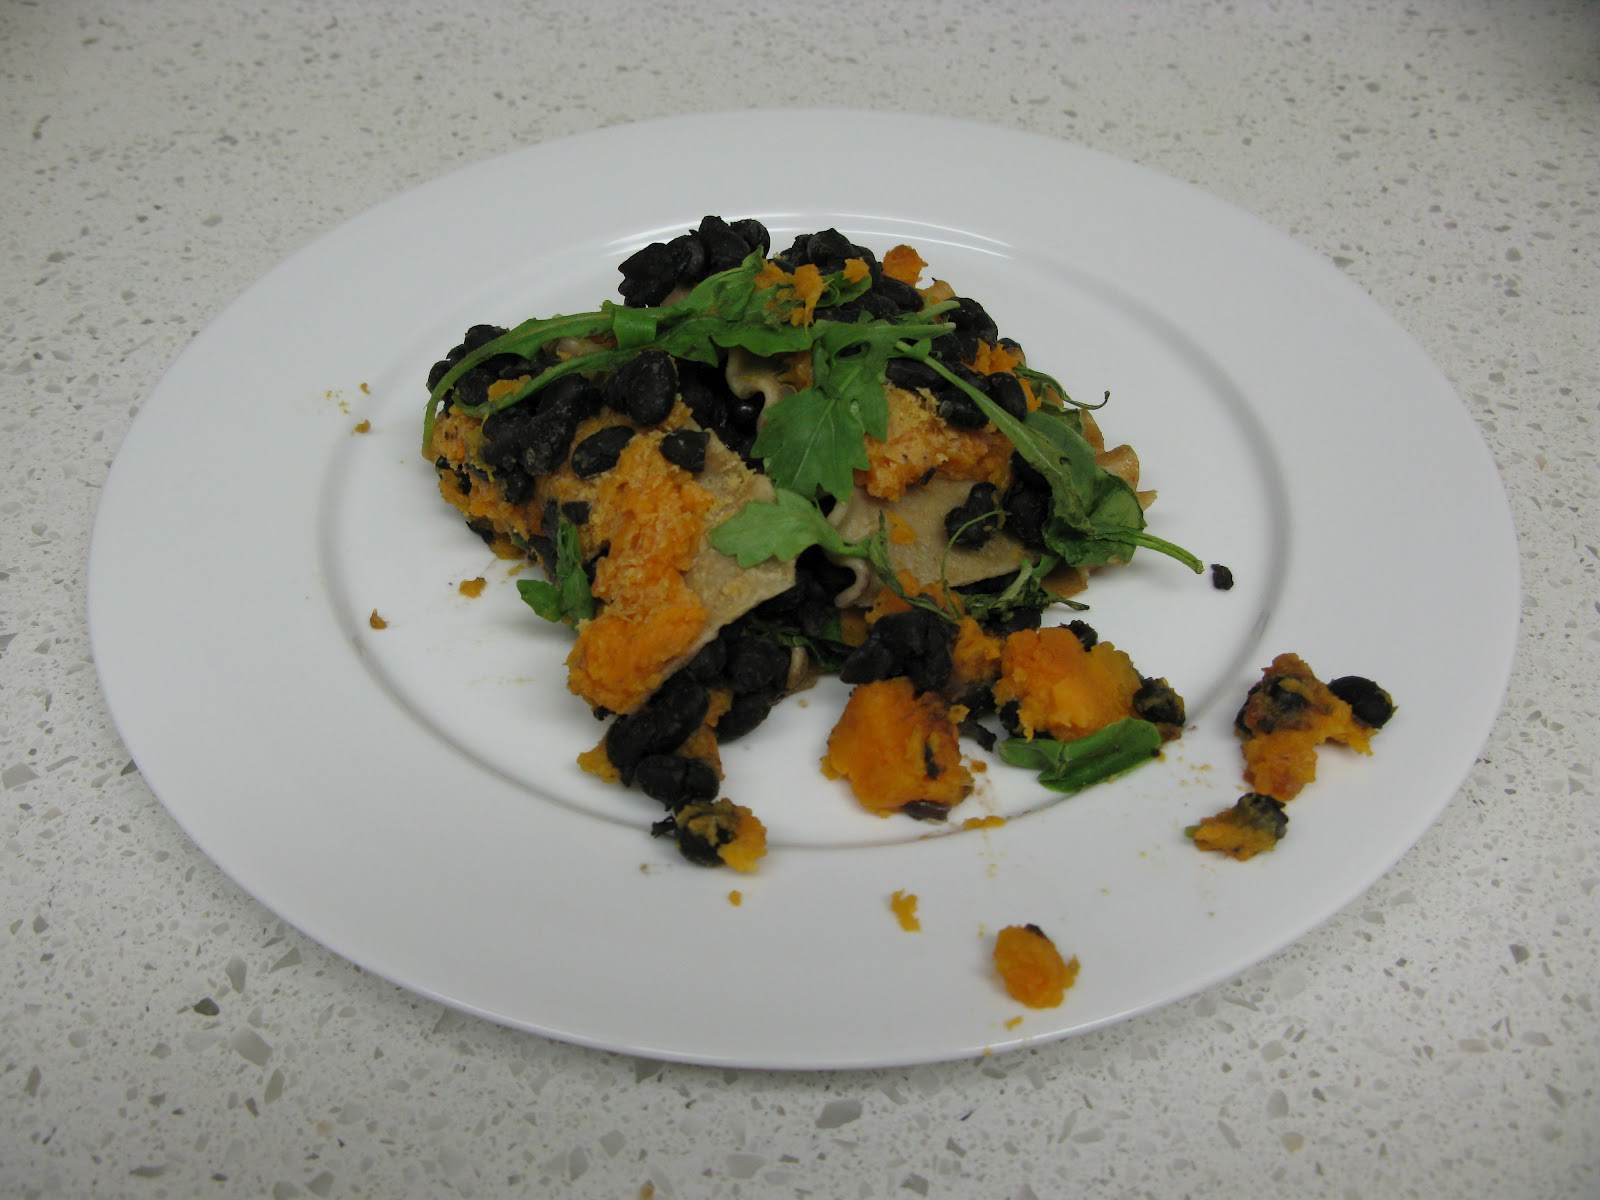
I wasn't sure if I was going to blog about tonight's dinner, but the hubby thought it looked pretty so I decided I would share. It was really just an experimental night. I had some lasagna noodles that I wanted to use up (since we don't really do lasagna anymore - not a fan of the fake vegan cheeses), so I thought I'd try putting something together. Let's just call it...

Colourful "Lasagna"
Yield: 1 9x13 pan (about 6 servings)

Ingredients:
2 large yams (the orange-coloured kind)
1 large Japanese eggplant
3 cups (750 ml) cooked black beans
6 whole-wheat lasagna noodles
Nutritional yeast - a little or a lot
2 cloves garlic, minced
about 1 cup (250 ml) vegan pasta sauce
about 5 oz (142 g) fresh leafy greens (e.g., arugula, spinach, kale, etc.)

Method:
1) Cook lasagna noodles according to package directions.
2) Peel and chop yams into small-ish pieces - this makes them cook faster. Put them into a pot of water, bring to a boil, then lower heat slightly and cook until they are softened (about 20-30 minutes). Mash them when done.
3) Chop the eggplant into half-moons. Saute the eggplant and garlic together with a spray of oil. Add the pasta sauce and cook until everything is relatively broken up and saucy.
4) Once everything is cooked, it's time to assemble! Spray the bottom of a 9x13 baking dish with some oil to prevent sticking, then add the layers as follows:

  • A single layer of lasagna noodles (3)
  • Half the leafy greens
  • Half the mashed yams
  • A sprinkling of nutritional yeast
  • All of the eggplant sauce
  • Half the black beans
  • The other three lasagna noodles
  • The rest of the yams
  • Another sprinkling of nutritional yeast
  • The rest of the black beans
  • The rest of the leafy greens

5) Cover the dish with aluminum foil, then bake at 425 F for about 10-15 minutes until the greens have wilted a little.

And here's what it looked like - lots of pretty colours! And it tasted pretty good too.


It's one of those recipes that you can really make your own. Don't like black beans - switch them out for some lentils, another kind of bean, or maybe some soft tofu. You could do more of the eggplant tomato sauce layers too if you'd like. Have fun experimenting - I know I did!

Monday, September 03, 2012

Whole-y Foods

I call myself a vegan because it's the quickest way to convey what I don't eat... but really, a more accurate term to describe my diet is whole-foods plant-based. What's the difference? Vegans don't eat any animal products, usually including things made by animals, like honey. Vegans also typically have a fairly political stance on animal welfare, so they usually make it more of a lifestyle (e.g., not buying clothing or shoes made from animals - no leather, not buying products tested on animals, etc.). While I fully support treating the animals that share our planet with us well, this was not the main reason that I decided to stop eating animal products. Some vegans will also eat a lot of processed animal-free products, like potato chips, fake meats, and french fries. While it is much harder to be an unhealthy vegan than an unhealthy omnivore, it's still quite possible if your diet is based on processed foods.

Like the traditional vegan, I also don't eat any animal products. However, what makes my diet different than that of some vegans is that it is based on whole foods. I try to avoid processed foods, including oils and refined sugars which are only parts of the original plants. Breads are usually okay as long as they are whole grain, as are whole-grain pastas. We do make use of some sauces that have non-whole food components, but try to limit these as well. Basically, we try to ensure that whatever we're eating has been minimally processed at the most, and ideally not processed at all. So the recipes you see here on this blog will be as whole-food as possible. So really, you could call me a whole-food vegan. :-)

Today's recipe is for hummous. Many people love hummous, and you hear it said a lot that it is full of protein and soooo good for you. Well, again, it depends on how processed it is. The hummous you buy in the grocery store tends to have a lot more in it than the usual chickpeas, garlic, tahini, and lemon juice that is the base of homemade hummous. Tahini itself (basically ground up sesame seeds) tends to add quite a bit of fat to the hummous, too. 

We recently ate at a vegetarian restaurant in Vancouver called The Foundation. The food at this place is uber-yummy, but the star of our dinner that evening was their hummous. It had black beans in addition to the chickpeas, and a special zing that I figured came from lime juice. So I decided to try making my own homemade version of it, but leaving out tahini to reduce the fat (and I'm just not a huge fan of the flavour of tahini either). Here is my attempt at homemade low-fat whole-food hummous.

Zingy Black Bean Hummous
Yield: about 4 cups

3 cups (750 ml) cooked chickpeas*
1 cup (250 ml) cooked black beans*
Juice from 3 limes
2 cloves garlic, finely minced
7 Tbsp (about 100 ml) water
1/4 tsp (1 ml) sea salt

Blend everything together in a food processor until desired consistency is reached. Taste, and add more lime juice, garlic, or salt as desired.

And here's what it looks like when it's done... admittedly it's a little grey, but it does actually taste quite good. And I bet it will be even better tomorrow when the flavours have had a chance to really mingle. I plan on eating it for a snack with baby carrots. Yum!


* I cook all my own beans from dried. I've found that "homemade" beans are a million times better than canned beans, and it's really quite easy to make them. Here's how:

  • put your dried beans onto a cookie sheet in a single-ish layer - pick them over to remove any stones or debris that might have gotten included
  • rinse the beans in a colander with running water
  • put rinsed beans into a large bowl and cover with about twice as much water (dried beans will expand by about three times, so ensure there is adequate space and water in your bowl)
  • put the bowl of beans in the fridge overnight to soak (soaking helps to reduce both the cooking time and the "gassiness" of beans)
  • the next day, drain off the soaking water
  • put soaked beans into a large pot and cover with water to about 2-3" above the beans
  • bring to a boil, then reduce to simmer
  • depending on the size of the bean, they will take anywhere from one hour to two hours (I found chickpeas usually take about 1.5 hours)
  • check regularly after one hour to ensure you don't overcook them - cooked beans should be mashable, but you may want to slightly undercook them if you're planning on adding them to a soup where they will still get more cooking time
  • be sure to skim off the foam on top of the cooked beans, then drain them

Cooked beans keep for a while in the fridge, but since I make very large batches at a time, I usually freeze them. Measure out 2 cups of beans for each sandwich-sized ziploc bag (this equates to about the same amount that you find in a can of beans), flatten the bag, label it, then freeze. Anytime you need beans, all you have to do is take a bag out of the freezer. So much tastier than canned beans and cheaper too!